Wednesday, February 07, 2007

Buyer Beware the Extended Camera Warranty – Deal or No Deal

Experience is always life's best teacher. But ideally it is through somebody else's experience that you could learn a valuable lesson about extended warranties.

What is the deal with extended warranties? Are they really an insurance against damage or malfunction?

A seasoned salesperson knows just when to propose the extended warranty; especially, those electronic store sales representatives. When you are high on the purchase the salesperson poses the question, “ Would you like the extended warranty added to this purchase?”. Now they Do NOT review the extended warranty Terms and Conditions (T's & C's) outlining the things that ARE NOT covered by the extended warranty. In fact, some of them purport (Like Future Shop which is part of the Best Buy chain of stores) it is a 'no hassle' insurance. BUNK!

Truth be told, the extended warranty merely extends the manufacturer's warranty and is confined to the same coverage restrictions. It is interesting that the major area where you would want coverage – damage or breakage from impact – IS NOT covered under an extended or a manufacturer's warranty. Review, up front, the details of the extended warranty contract. You will discover lots of exclusions with respect to damage.

Consumer Reports Magazine surveyed tens of thousands of its readers about their repair experience with an extended warranty. The repair cost usually was less than the extended warranty cost. Consumer Reports Magazine concluded from this 2002 research that extended warranties are NOT A GOOD INVESTMENT.

Studies have shown that electronic stores use extended warranties to bolster their profit margins on low margin electronic items. The extended warranty could add 30% to the cost of your purchase. Smooth-talking efforts to sell customers extended warranties is usually part of a sales employee's compensation and job security.

An Extended Warranty seems to be a case of 'buyer beware'. Remember electronic equipment and camera prices drop very quickly. Newer products are introduced every 6 to 12 months forcing that once 'state-of-the-art' item you have to be flushed from manufacturer's inventory at rock bottom prices to retailers and consumers. This short product life-cycle creates a cut-throat competitive retail pricing environment among manufacturers and retail stores. Extended warranty sales improve a retail store's bottom line.

Instead of repairing your damaged camera, consider replacing it via one of the on-line auctions. This bid-price for the exact used [undamaged] product you have could prove less cost than the extended warranty cost. You will have just saved yourself some money and the frustration of arguing with a customer service representative to have an extended warranty claim honored by the retail store.

Labels: , , , , , , , ,

Tuesday, October 31, 2006

No-Flash Photography Using Available Light or Low Light Can Exact Rewarding Images Even Photo Art


Low-Light, Slow Shutter Speed, No Flash Photography!

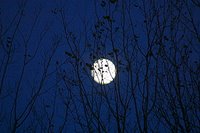
This lighting challenge no longer needs to put fear into a photographer's heart. It's possible to get perfect photos with a digital SLR and a few simple techniques.

Sometimes a flash brings you sunlight and then there are times when using a flash just takes away the mood of the moment. At times light voids the image of emotion. Like an artist poised in front of a blank canvass, the photographer chooses light, color, texture and shape to portray theirPhoto Art to share with the world.

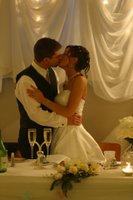
I love to capture candid, journalistic style images of people during highly emotive events such as weddings and milestone birthdays. Take my lead and sit or crouch in a corner, almost invisible to the subjects and capture a loving look, a comforting touch or a smile that lights up the room. To capture these candid images and maintain your anonymity, you have to be non-intrusive. Using a camera flash defeats that purpose. In fact, a flash can be quite annoying to the subjects as well as any others present.

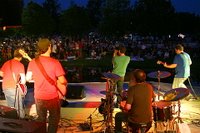
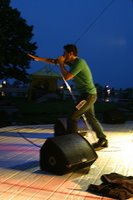
Using a flash captures the moment and then stops the subject cold (to collect themselves) before going on. The flash is not conducive to spontaneity and a natural flow of action. Capturing the energy of a live band performance is always an exciting project. There is the uncertainty of lighting, obstruction by instruments, equipment and people, and not knowing how each song will bring out the emotions of the artists. Imagine the bad reception you would get if you, as the band photographer, started poppin' flashes during the performance! Oooouch! Now that would be a mood wrecker, wouldn't it?

In 'use the available light' situations you should be brave! Be bold! Shoot no-flash with confidence. Shoot without a tripod or unipod to stabilize the camera. Wow! Is this really possible? Yes my friend it is!


    It is a real treat to shoot no-flash images with a digital SLR. I've taken thousands of images using the available light with my Canon D60 (an oldie but goodie in the digital camera world) with a number of different lenses :

  1. Canon EF 28-135mm f/3.5-5.6

  2. Sigma 70-200mm f/2.8 (a heavy lens but fast for low light and action shots)

  3. Sigma 28-300mm f/3.5-6.3 (my all around on-camera lens).


I have achieved great results with all these lenses in low-light, no-flash situations. You can achieve this with film, but with digital you get to instantly view the shot and can make adjustments to create some funky photo art. Plus with a digital SLR you can use the rapid fire feature and guarantee that one of the images will be perfect. And the no developing, no negatives means no cost for snapping a lot of digital images. Play the odds!

    A few tips that will make the odds work in your favor:

  1. set your ISO speed to 400 or Higher - I shoot at ISO 400

  2. set Drive Mode to continuous shooting – you'll be using rapid fire often

  3. use Tv (shutter priority) or M (Manual Exposure) - experiment using both shutter modes

  4. use both Auto Focus and Manual Focus on your lens – remember Auto Focus sometimes is too slow to work properly in low-light environments

  5. you will be free-shooting at aperture speeds of 1/20 to 1/8 or lower. Use one of these camera stabilizing techniques: 1) elbows/arms on stable surface even if it is your knee or thigh; 2) arms tight to body and, my favorite; 3) don't breathe when snapping images


Now the fun begins. You will be constantly adjusting aperture speeds and focus every time you point your lens or your subject moves or the light changes. But don't stop shooting!

I have found that if I bring the aperture speed down to where the camera indicates you don't need a flash (1/15), I will shoot multiple photos at that speed and then also shoot some at 1/20 and 1/10. Remember to meter on the subject not the light. You will be surprised at the different colors and emotions you capture by manually bracketing the shots this way. Again, experiment. Have fun! Keep moving around. Get a lot of close-up shots. Use the light source that comes from where ever or what ever (e.g. stage lights, candlelight, window light, flash light, fire light). Take lots of pictures. Move around your subject(s). Take more pictures. This is just too much fun!

At these slow aperture speeds you will get some blur. This effectively captures motion and adds an very artistic touch to your photos.

Couple your ability to frame a shot with the post production capabilities of Picasa by Google, and you will create some incredible Foto Art.

Low light? – No problem!

Monday, October 09, 2006

Artificial Lighting Can Duplicate Most Natural Light Situations - For Close-up Photographs Replicate Sunshine With Your Off Camera Flash – Sometimes N


Ever wonder how the photography pros seem to get those perfect close-ups of flowers, a face or an otherwise shaded object?

The photographers world is one of perfecting an art form. It's about capturing the subject in the proper light. It is not about delivering a real-life image. It's about capturing impactful color, texture and shape when engaging the camera shutter. The photographers craft is image media art.

On your next field trip to the park or on a hike into the interior of a forest, take your flash unit and an off camera shoe cord. The shoe cord is usually a curly flash extension cord that connects your camera flash shoe to your flash unit and allows you to hold the flash unit up to 3 feet away from your camera. Hold the flash unit to the right or to the left of your subject. Hold it high and over the top of your subject or, even have the light source come from below or behind your subject. Your flash can be positioned anywhere in a virtual 3 foot sphere around your camera. This provides you countless number of ways to simulate light and shadow for your close-up, still and portrait photography.

Bring along a friend. Have them hold a flash reflector, a white cloth or a reflective surface (like the one used in car windshields to reduce direct sunlight and heat buildup). Use this sun reflective surface with existing sunlight or your off camera flash. Now you have multiplied your possibilities for soft or diffused lighting for your images.

Create your own sun for those close-ups, stills and portraits. Just bring your:
1) Flash unit

2) Off Camera Shoe Cord

3) Reflective Surface for diffused lighting

4) A Friend


You no longer need to wait for that 'right light' to capture an awesome photographic image. Experiment with artificial light and you will be delighted with the results. Here Comes Your Sun.

Sunday, October 08, 2006

Amateur Photographers: You Can Make this World a Happier Place by Knowing Where to Share Images and Scanned Photos


Autumn is a perfect time for all photographers, professional and hobbyist, to travel the countrysides to capture the spectrum of fall colors that abound for a brief time each year. Point your lens anywhere during this cavalcade of color and, like a finger print, you will get at least one shot that is uniquely yours!

It is said that the best picture images are those that amateur photographers have not shared with others. This is the case with my own passion of Photographic Art. I was encouraged for years by family and friends to Sell My Stuff. I ask you to consider sharing with the world the beauty you have captured on film or through your digital photos! The world has enough dark and dread already. You can help tip the balance in favor of beauty and brightness! Share your delightful images with the world in all its autumn splendor.

How? You ask?

Would you like to share your camera images with a minimum of text? Well, there is Flickr, an easy place to load up your choice images for the world to view and on which to comment. Or Photosite is another choice photo sharing site. Search on Photo Sharing and you will see numerous FREE image and video hosting websites. You will find other photographers are very liberal in their praise of a 'great shot'. It can be a very encouraging and supportive community. If you can take constructive criticism then, you, too, will thrive in this learning environment.

Currently (September 2006) I am in a beta test environment of Google's latest effort - Picasa Web Albums. I am an avid user of Picasa. Yes, as a professional photographer, most of my wedding and landscape images have been cataloged and adjusted using the power of Picasa. Adobe Photoshop has been relegated to only specific special effects.

If you wish to add a story or more detail behind the images, then I encourage you to use one of the many BLOGS (weB LOGS) that exist. But choose one or two of them that allow images to be uploaded to accompany your text. The newest BLOG site by Google, blogger, is such a site that allows you creative license. In fact, you can post multi images per BLOG article. With some of the other BLOG sites you can overcome the shortcoming of not being able to integrate images; simply by referencing your related images posted in Flickr or Google Picasa Web Albums.

Most BLOGS have an 'Insert HyperLink button', but a simple piece of html code inserted right in your article is all that is required:
1) Open a new browser window and go to the specific site and location of the group of pictures you which to 'hyper link' from your BLOG article
2) Copy the URL found in the menu line at the top of the browser window
3) Return to your article, locate your cursor at the place you wish to reference your image web location
4) Type and paste the following:

A) type: <
B) immediately type: a href="
C) paste the url you just copied from your photo image website
D) type: ">Look at my images here (or some description)<
E) immediately type: /a>

People reading your BLOG will now be able to hyperlink to your expanded collection of photo images.

Google's Blogger gives you the ability to integrate multiple images with your posted BLOG and then you can easily hyperlink your Posted Article Title to even more images on Flickr or (soon) Google Picasa Web Albums. Isn't the internet grand!


You have questions on exactly how to do this? Take a look at a few of my BLOG articles. Still have questions? E-mail me through one of the websites below.


Get out there and do your part to make this world a brighter and happier place to live!

Wednesday, May 24, 2006

Photographers Welcome to Picasa

Photographers welcome to Picasa - As a photographer, you look for easier ways to catalogue, store and perform some post production enhancements to your digital pictures. Well look no more! Go NOW and download Picasa from the Google web site - FOR FREE! An intuitive, WYSIWYG (What You See Is What You Get), FREE Windows application that will have you giggling (or googling) with delight. The drudgery of cropping, red-eye removal, sharpening, softening, lighening, and "special effecting" pictures has just become fun! Check it out and let me know what you think?

SLR Film Photography Special Effect (Part 2) - Impressionist Effect


This is a second article addressing SLR film photography Special Effects techniques that can be accomplished “through the lens”, being immediately immortalized on the film and ultimately the negative.

It requires no special instructions to the developing agent, whether your local photography shop or mail in developing service. Your prints will be developed with perfect exposure.

The Impressionist Effect, like the Ghosting Effect detailed in Part 1, , is accomplished by using your SLR's multiple exposure feature, with a simpler procedure than outlined in your SLR user manual. The Impressionist Effect is more like photo art, ideal for still life or landscape photography, where all is motionless. This effect works particularly well for photographing flowers but would create an equally impactful and artistic photograph of any still life shot that exhibits lots of different colors; like brightly painted houses, fishing boats or toys.

You only take two exposures on the same film frame, one in-focus and the second out-of-focus. This will give your photograph that Monet-style look. The key is that nothing within the frame moves between the first and second shot.

The simple steps to execute the Impressionist Effect are:


1. Stabilize the camera using - a tripod is best, a stable surface is a second option. You might even want to use a remote shutter release cable to avoid any camera jitter.

2. Set number of multiple exposures on your SLR to '2';

3. For the roll of film in your SLR, determine the film speed (S);

4. Reset the camera film speed (Yes, you can override the setting) to (2 × S) or, if not an exact match, set it to the absolute closest speed ((2 × S) ± adjustment);

5. Turn OFF the camera's LENS Automatic Focus feature (located on the Lens itself);

6. Take your first shot with the frame in sharp focus;

7. Take the second shot with the frame completely out of focus (Yes, turn your lens to extreme out of focus.


REMEMBER: Check and reset the SLR film speed and number of exposures to their original settings before continuing with your next shot. Some SLRs will automatically reset the number of exposures back to '1' before advancing the film to the next frame. It's always better to verify this.

All of the SLR Film Special Effects for the Impressionist Effect, detailed in this and the previous Ghosting Effect article, require no special instructions for developing your film. Normal developing at the rated film speed will ensure the picture is properly exposed and developed.

This truly artistic photograph will have you considering a number of display options - maybe an 8” x 10” enlargement, or alternatively, a 4” x 6” print in an 8” x 10” double mat – accentuating the Impressionists Art with the classic beauty of a pewter frame. What a thoughtful gift idea for someone special or that special occasion.

SLR Film Photography Special Effect (Part 1) - Ghosting Effect


I know there are some photographers that still like to pick up that trusty ol' SLR, insert a roll of film and get out there and experiment in the field. Then approach with grinning anticipation as they pick up the developed film from their favorite photo shop and have the person behind the counter ask, “How did you take that picture? It's awesome!”

It is this photography 'purest' to whom I appeal (this time) – the ones that still like using film every now and then. Most photographers have Digital SLRs (DSLR - “et moi aussi”). I know you can create this effect with Photoshop, after the fact; but having creative control over this special effect makes it exciting because you execute this photo miracle at the precise moment you push the shutter button.

Ghosting. This is what this special effect is called; accomplished by using your SLR's multiple exposure feature, but with a simple twist to ensure proper film exposure. The procedure detailed in this article is different from the instructions in your SLR manual. Ghosting is perfect for pictures involving subjects in motion, taken when the camera and the background is stable (not moving) and the subjects move through, around, or across the frame. I have had great success using this effect when photographing people moving about an historic site or children as they scamper over rocks. I have also used this effect for weddings and sports shoots.

Example (see images above): In one wedding photograph, the groom stood still at the bottom of stone steps to an historic dwelling, his hand extended towards his bride, who slowly moved down the steps toward her groom. My six deliberate 'clicks' of the shutter created an airy, surreal picture of the wedding couple.

Depending on the speed of the moving subjects, the shutter can be held down in rapid fire mode or each exposure can be meticulously choreographed:
1) each subject deliberately positioned in the frame,
2) one 'click' of the shutter, and
3) repeat steps 1 and 2 to the total number of multiple exposures you set in your camera.

So what are the mechanics of this “through the lens” shot to achieve the ghosting effect?


1. Stabilize the camera – using a tripod is best, a stable surface is a second option or, a steady hand as a last resort;

2. Set number of multiple exposures you require for the frame to (N) – usually 1 to 9;

3. For the roll of film in your SLR, determine the film speed (S);

4. Reset the camera film speed (Yes, you can override the setting) to (N × S) or, if not an exact match, set it to the absolute closest speed ((N × S) ± adjustment);

5. Take your picture, depressing the shutter button for a total count equalling the number of camera exposures you set in step “2”.

Example:

1. You want 6 exposures on the frame (N=6) so set the number of multiple exposures to '6';

2. You've determined the film speed is 200 (S=200);

3. Reset the camera film speed to '1200' (= 200 × 6);

4. Depress the shutter button 6 times (for 6 exposures).


REMEMBER: Check and reset the SLR film speed and number of exposures to their original settings before continuing with your next shot. Some SLRs will automatically reset the number of exposures back to '1' before advancing the film to the next frame. It's always better to verify this.


There are no special instructions for developing your film. Normal developing at the rated film speed will ensure the picture is properly exposed and developed – simple and beautiful. This is photo art!

PS: you can use this same set-up for your SLR - but instead of using the tripod. just rotate your camera clockwise (or counter clockwise) as you snap each frame. Voila! now you have a swirl effect.

Picasa: Creating a simple slide show CD or DVD with JPG images


As a photographer, I like easy ways of storing, editing and producing digital pictures. As a moderate user of Adobe Photoshop, I have now discovered Picasa, Free Software from Google that allows you to simply catalogue, store and perform some post production enhancements to your digital pictures.

Like many Digital Photographers, you may want duplicates (multiple versions) of your digital pictures, to which you apply various enhancements - cropping, B&W, softening, etc. If you are using Picasa, then you will need to apply some file renaming to ensure your pictures are grouped together: picture original, picture copy1, picture copy2,,,picture copyn. Currently, duplicating a digital picture within Picasa does not produce a filename which preserves the desired filename sequence (ascending sort - alphabetic order) - "Original, OriginalCopy, OriginalCopy (2),,OriginalCopy (n)"

Do not despair. Here is a simple fix that will ensure that your 'CD of JPG images' will playback properly on an inexpensive DVD player ($29.95 at Walmart), which is capable of playing back (like a Slide Show) stored JPG images.

A little background on how Picasa creates JPG file copies on your computer. When you copy/duplicate a file in Picasa it creates the copied file with the following prefix - “Copy of IMAGEnnnn.jpg”. Since alphabetic sequencing has "C" coming before "I", this means that all of the prefixed files with “Copy of” are saved in your computer [picture] directory ahead of the original JPG images, which all start with “IMG” or “IMAGE” - Ouch! But you want all your JPG picture files to start with "IMG" or "IMAGE", just like they were originally created on your digital camera.

Apply a simple and consistent renaming of these "Copy of" JPG files and you will get the desired playback sequence. Rename these “Copy of” files so that the original filename prefix is preserved - “IMG” or“IMAGE”. Just remove the “Copy of” prefix and add an appropriate ascending numeric sequence suffix to each of the copied files.
For example, IF your original JPG file and the Picasa two copies were:
IMG_2787, Copy of IMG_2787, Copy (2) of IMG_2787

THEN you would rename the TWO Copy files to get this grouped sequence:
IMG_2787, IMG_2787-2, IMG_2787-3


Now you will be sure that the filename sequence will match your desired Slide Show sequence.

You can submit an enhancement request to Picasa to fix the way they name copied files (Adobe has is right!). You can submit your request to: Picasa Help Ticket Submission. The more requests the sooner they fix this inconvenience.

For other timely tips, go to:

Foursight Photography
And
BizFare Enterprise